
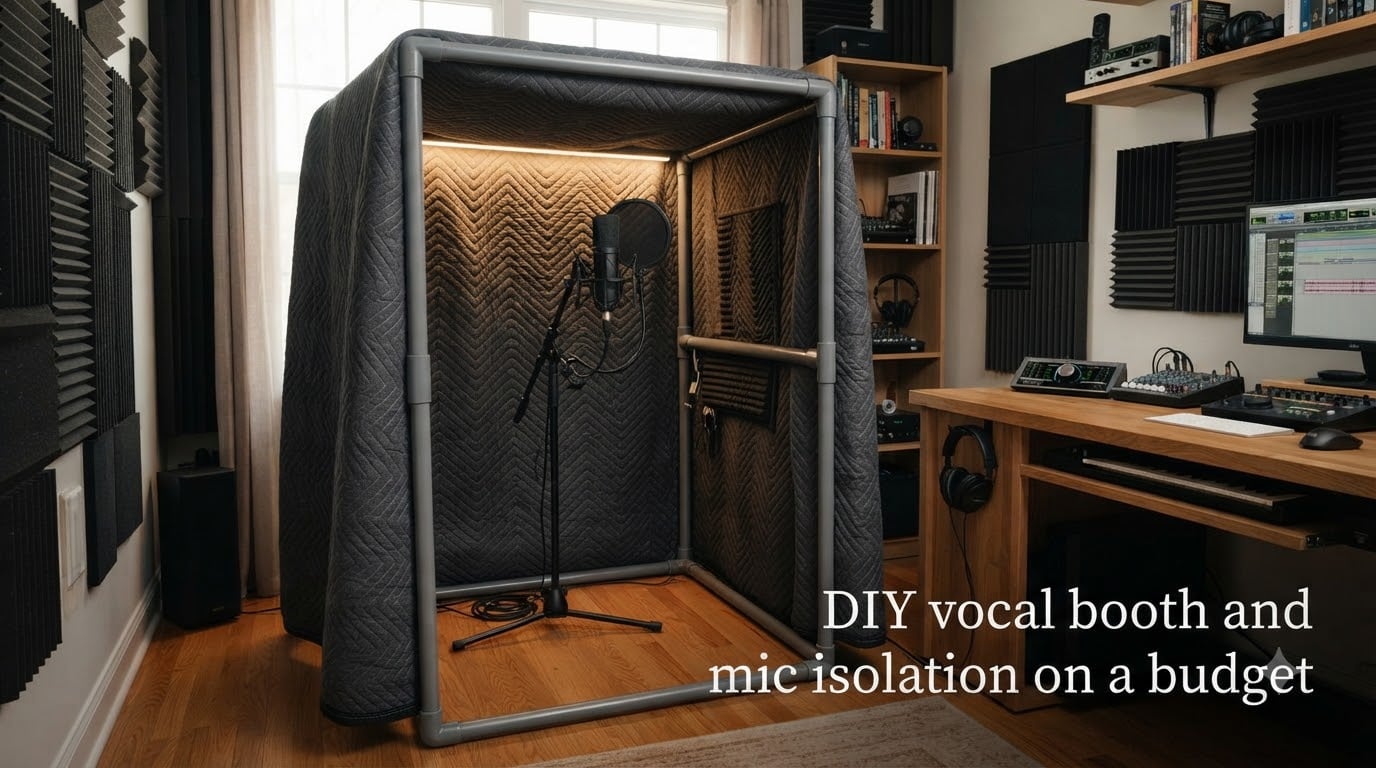
I built my first DIY vocal booth in a converted closet using moving blankets and PVC pipe. The before-and-after audio was so dramatic that my podcast listeners immediately asked what I had changed.
If you are recording vocals, podcasts, voice-overs, or audiobooks from home, you have probably noticed the same thing I did: clean recordings are nearly impossible without controlling your acoustic space. Room reflections, street noise, computer hum, and HVAC rumble all bleed into your microphone. A proper vocal booth solves this, but commercial solutions often cost over a thousand dollars.
In this guide, I will walk you through four proven DIY vocal booth methods I have tested, including the exact materials, costs, and construction steps. Whether you are a renter who needs a non-permanent setup, a voice-over artist working on a tight budget, or a podcaster upgrading from a bare room, you will find a build that fits your situation. Most of these methods come in well under 200 dollars, and the cheapest one costs nothing at all.
Table of Contents
- What Is a DIY Vocal Booth and Why You Need One?
- Sound Absorption vs Soundproofing: The Critical Difference
- 4 Budget DIY Vocal Booth Methods Compared
- How to Build a PVC Frame Vocal Booth Step by Step
- Renter-Friendly Vocal Booth Solutions
- Common Mistakes to Avoid
- Best Materials for DIY Vocal Booth Construction
- Testing Your DIY Vocal Booth Effectiveness
- Ventilation and Lighting Considerations
- Frequently Asked Questions
- Final Thoughts on Building Your DIY Vocal Booth
What Is a DIY Vocal Booth and Why You Need One?
A DIY vocal booth is a homemade enclosure that reduces room reflections and isolates your microphone from unwanted noise. It is built from common materials like PVC pipe, moving blankets, acoustic foam, or even mattresses, all designed to absorb sound waves before they bounce back into your microphone.
Any home studio artist recording vocals, podcasts, voice-overs, audiobooks, or YouTube content benefits from a vocal booth. Without one, sound waves bounce off your walls, ceiling, and hard surfaces, creating reverb and room noise that compromise your recording quality. I learned this the hard way when I compared two identical takes, one in my untreated living room and one inside my first booth. The booth version had noticeably less echo and a tighter, more professional sound.
The cost difference between building and buying is huge. Commercial vocal booths from brands like Vocal Booth To Go, VEVOR, and SoundAssured range from several hundred to several thousand dollars. A DIY vocal booth delivers 80 to 90 percent of the acoustic performance at a fraction of the price, and you can customize it to your exact space.
Sound Absorption vs Soundproofing: The Critical Difference
Understanding the difference between sound absorption and soundproofing will save you money and frustration. These two concepts are often confused, even by people who have been recording at home for years.
Sound absorption uses soft, porous materials to soak up sound waves and stop them from bouncing around your room. Acoustic foam, moving blankets, fiberglass insulation, and thick curtains all work this way. Their job is to reduce reflections inside your recording space so your microphone captures only your direct voice.
Soundproofing is something entirely different. It involves dense, heavy materials and sealed construction to block sound from entering or leaving a room. Drywall with insulation, mass-loaded vinyl, and solid-core doors are soundproofing materials. A true soundproof build is far more expensive and complex than most DIY vocal booth projects.
For a budget DIY vocal booth, you should focus almost entirely on sound absorption. You want to kill reflections and reverb, not build an anechoic chamber. Most home recording issues come from room reflections, not from outside noise leaking in. Once you understand this, you can pick the right materials and skip the expensive soundproofing products.
4 Budget DIY Vocal Booth Methods Compared
Over the past three years, I have built and tested four popular DIY vocal booth methods. Each one works differently, and each has strengths depending on your space, budget, and whether you rent or own your home.
The closet conversion is the simplest option if you have a spare closet with clothes. The PVC frame and blankets method is the most popular among voice-over professionals because it is portable and effective. The mattress fort is the cheapest option and works in a pinch. The portable desktop booth is the smallest and best for voice-overs with very limited space.
Here is a quick comparison of all four methods based on my testing and feedback from the audio engineering community:
| Method | Cost | Effectiveness | Portability | Renter-Friendly |
|---|---|---|---|---|
| Closet Conversion | 0 to 80 dollars | High | No | Yes |
| PVC Frame and Blankets | 80 to 200 dollars | Very High | Yes | Yes |
| Mattress Fort | 0 to 50 dollars | Medium | Yes | Yes |
| Portable Desktop Booth | 30 to 100 dollars | Medium | Very High | Yes |
The PVC frame method has become the community consensus pick for serious voice-over work, while closet conversions dominate podcast and music recording setups. The mattress fort is perfect when you need to record something right now without spending anything.
How to Build a PVC Frame Vocal Booth Step by Step
This is the most popular method among home studio voice actors and musicians, and for good reason. It delivers excellent sound absorption, takes about two hours to build, and breaks down completely when you need your room back. I built my second booth this way and have used it for over 150 hours of recording with zero issues.
Materials checklist (approximate costs):
1-inch PVC pipe, ten 10-foot lengths (about 35 dollars)
8 moving blankets (about 80 dollars total)
8 PVC 3-way corner connectors (about 15 dollars)
8 PVC tee connectors (about 12 dollars)
Bungee cords or zip ties (about 10 dollars)
Microphone stand and reflection filter (optional, about 50 to 100 dollars)
Step 1: Plan your dimensions. Build a frame that is roughly 4 feet wide, 3 feet deep, and 7 feet tall. This gives you enough room to stand comfortably inside with your mic stand. Building too small creates worse acoustics than no booth at all, so resist the urge to save space.
Step 2: Cut your PVC pipe. Cut four vertical pieces to 7 feet, four horizontal top pieces to 4 feet, and four horizontal top pieces to 3 feet. Cut two additional 4-foot pieces for the base crossbars. A simple PVC cutter or hacksaw works fine.
Step 3: Assemble the base. Connect two 4-foot pieces with two 3-way corner connectors to form a rectangle. Add the two base crossbars using tee connectors in the middle for stability.
Step 4: Build the vertical frame. Attach the four 7-foot uprights to the corners using the remaining 3-way connectors. Add tee connectors at the top for the ceiling frame.
Step 5: Construct the ceiling. Connect the four top horizontal pieces (two 4-foot and two 3-foot) into a rectangle and attach to the uprights.
Step 6: Drape the moving blankets. Hang blankets over the entire frame, including the top, sides, and back. Use bungee cords or zip ties to secure them. Layer two blankets thickly on the side facing your computer or noisest wall.
Step 7: Test and adjust. Stand inside with your mic and do a test recording. Listen for any obvious reflections or external noise bleed. Add more blankets where you hear problems.
Pro tip from the voice-over community: leave a small gap at the bottom for cable management and ventilation. A cheap USB fan placed outside the booth can push cool air in without creating noise problems.
Renter-Friendly Vocal Booth Solutions
If you rent your home, you cannot drill holes, install foam panels, or build permanent structures. I have rented for most of my recording career, so every booth I have built works without leaving a mark on the walls.
The PVC frame and blankets method is the gold standard for renters because it requires zero modifications to your space. When you move, you disassemble it in about 20 minutes and pack the PVC and blankets into a closet or storage unit. No holes, no residue, no landlord complaints.
The mattress fort is another great renter-friendly option. You simply lean a mattress or two against each other in a corner, drape blankets over the top, and record inside. When you are done, you put the mattress back on your bed. It takes five minutes to set up and break down.
For the smallest possible footprint, consider a portable desktop vocal booth. These are collapsible shields that mount behind your microphone and create a small reflection-free zone right on your desk. They cost between 30 and 100 dollars, fit in a closet when not in use, and work surprisingly well for voice-over work and podcasting.
Storage is the main challenge with renter-friendly solutions. Plan ahead by labeling your PVC pieces and folding blankets neatly. A few minutes of organization saves hours of frustration when you need to set up or tear down.
Common Mistakes to Avoid
I have made nearly every mistake possible when building DIY vocal booths. Here are the biggest ones to skip so you do not waste time and money.
Mistake 1: Building too small. A booth that is too cramped creates its own acoustic problems and makes it impossible to position your mic properly. Stick to at least 4 by 3 feet of floor space.
Mistake 2: Ignoring ventilation. Recording inside a sealed booth for an hour gets hot fast. Plan for airflow with a quiet fan or vent gaps before you start recording long sessions.
Mistake 3: Skipping acoustic treatment inside the booth. Bare walls inside your booth can still cause reflections. Hang blankets, foam, or soft materials on every interior surface.
Mistake 4: Using the wrong materials. Egg cartons, cardboard, and thin foam do almost nothing. You need dense, soft materials like moving blankets, acoustic foam (NRC rated 0.7 or higher), or thick mattresses.
Mistake 5: Setting up in a noisy corner. Placing your booth next to a refrigerator, HVAC vent, or busy street wall picks up constant noise. Choose the quietest part of your space, usually an interior corner away from appliances.
Best Materials for DIY Vocal Booth Construction
Picking the right materials makes the difference between a booth that works and one that does not. After testing dozens of combinations, here is what actually delivers results on a budget.
Moving blankets are the single best value in DIY vocal booth construction. At about 10 dollars each, they provide dense, sound-absorbing material that rivals products costing five times more. Look for the heavy-duty quilted cotton variety, not the thin synthetic ones sold at hardware stores.
Acoustic foam panels with an NRC rating of 0.7 or higher work great for permanent installations but cost more. A 2-foot by 2-foot panel runs 15 to 30 dollars. If you go this route, focus on the first reflection points around your microphone.
PVC pipe is the standard for frame construction because it is cheap, lightweight, and requires no tools beyond a cutter. You can also use wooden dowels or metal conduit, but PVC is the easiest for beginners.
Mattresses and mattress toppers add bass trapping and low-frequency absorption that foam and blankets miss. A memory foam topper from a thrift store can become part of a budget booth for under 30 dollars. This is why the mattress fort method actually works.
Skip products marketed as “soundproofing foam” with NRC ratings below 0.5, egg crate mattress toppers, and any thin foam. They look the part but do not absorb enough sound to matter.
Testing Your DIY Vocal Booth Effectiveness
How do you know if your booth actually works? I use three simple tests every time I build or modify a setup, and they take less than 30 minutes.
The clap test is the fastest way to spot obvious reflection problems. Stand inside your booth with the microphone positioned where you normally record. Have someone stand outside the booth and clap sharply. Listen on headphones for any echo or ringing. A well-treated booth sounds almost completely dead after the initial clap.
The before-and-after recording test gives you concrete proof. Record yourself speaking the same paragraph twice, once in your untreated room and once inside your booth. Listen back on quality headphones. You should hear noticeably less reverb, fewer reflections, and a tighter vocal sound inside the booth.
A spectrum analysis using free software like Audacity or Room EQ Wizard shows the frequency response of your space. Look for peaks in the 200 to 500 Hz range, which indicate standing wave problems. Add bass traps in corners to tame these frequencies.
I run all three tests before I declare any booth finished. Skipping testing means you might record for months without realizing your booth is creating new acoustic problems.
Ventilation and Lighting Considerations
Two practical issues that almost every DIY vocal booth guide forgets are ventilation and lighting. Skip them and your booth becomes uncomfortable to use.
Heat builds up fast inside a small enclosed space, especially with a microphone, computer, and lights running. A quiet USB fan placed outside the booth aimed at an open corner keeps air moving without adding noise to your recording. For longer sessions, consider a small vent cut into the bottom of your blanket covering.
Lighting matters more than most beginners expect. You will be reading scripts, adjusting equipment, and looking at notes inside your booth. A clip-on LED light or a small softbox lamp mounted to your mic stand works perfectly. Avoid fluorescent bulbs since they can interfere with some audio interfaces.
If your booth sits in a dark corner, add a soft warm light to reduce eye strain during long recording sessions. Voice-over artists often spend hours reading in their booth, so comfortable lighting saves fatigue.
Frequently Asked Questions
How can I make a DIY portable vocal isolation booth?
Build a PVC pipe frame in a 4-foot by 3-foot by 7-foot rectangle using 1-inch PVC and 3-way connectors. Drape 8 heavy-duty moving blankets over the frame and secure them with bungee cords. The entire build costs around 150 dollars, sets up in 2 hours, and disassembles completely for storage or moving.
How much does it cost to build a soundproof booth?
A DIY vocal booth focused on sound absorption costs between 0 and 200 dollars depending on the method. A mattress fort is free, a closet conversion costs 0 to 80 dollars, and a PVC frame with moving blankets runs 80 to 200 dollars. True soundproofing that blocks outside noise requires mass-loaded vinyl, drywall, and decoupled construction and typically starts at 1000 dollars.
How can I make a DIY sound isolation box?
For a desktop mic isolation box, line a plastic storage container with acoustic foam or mattress topper. Cut a hole for your microphone cable and mount the mic inside facing the open top. This creates a small reflection-free zone for under 50 dollars and works well for voice-over and podcast recording.
Do vocal isolation booths work?
Yes, DIY vocal booths work very well for sound absorption, which is what most home recording actually needs. They reduce room reflections, reverb, and ambient noise so your microphone captures cleaner vocals. They do not block outside noise from entering your room, which is true soundproofing and requires much more expensive construction.
Final Thoughts on Building Your DIY Vocal Booth
A DIY vocal booth is one of the highest-impact upgrades you can make to a home recording setup. For under 200 dollars and a weekend of work, you can transform your recordings from amateur to professional quality.
Pick the method that matches your space and budget, gather your materials, and build it this weekend. Test your booth with the clap test and before-and-after recordings, then enjoy cleaner vocals on every project going forward. For more guides on building a streaming and podcasting setup on a budget, bookmark our site and check back often.